Tuesday, August 5, 2008

Add or delete holidays and custom events in your calendar

By default, no holidays are added to your calendar when you begin using Microsoft Office Outlook.
Note If you are using Microsoft Office Outlook 2003 and want holidays for years 2008 through 2012, go for Microsoft Outlook Support Services.
More information about holidays and events
Holidays are all-day events.
You can also create custom holiday files for other types of nonholiday events, such as quarterly deadlines or your organization's paydays.
Add holidays and events
1. On the Tools menu, click Options, and then click Calendar Options.
2. Under Calendar options, click Add Holidays.

3. Select the check box next to each country/region whose holidays you want to add to your calendar, and then click OK.
Note Your own country/region is automatically selected.
If you already added a country's or region's holidays to your calendar, the check box for that country/region is selected in the Add Holidays to Calendar dialog box. If you try to add the same items again, you receive the following message:
Holidays for country/region are already installed. Do you want to install them again?
If you click Yes, the holidays and events are installed a second time, and you see duplicate holiday and event entries.
Note The holiday information that is provided with Outlook includes items during calendar years 2006 through 2012. If you are using a non-Gregorian calendar, items that occur during the same time period are included.
Delete holidays and events
You can also use the following steps to delete any duplicate holidays that were added while you were adding holidays to your calendar.
1. In Calendar, on the View menu, point to Current View, and then click Events.
2. Select the holidays that you want to delete. To select multiple rows, press the CTRL key, and then click other rows.
Tip Click the Calendar icon to select a row. Do not click in the data cells of the row.
3. Click Delete on the Standard toolbar.
Tip To quickly delete all of the holidays for a country/region, click the Location column heading to sort the list of events so that it displays all of the holidays for a country/region together.
Wednesday, July 30, 2008

How to Share my Calendar

1. In Calendar, in the Navigation Pane (Navigation Pane: The column on the left side of the Outlook window that includes panes such as Shortcuts or Mail and the shortcuts or folders within each pane. Click a folder to show the items in the folder.), click Share My Calendar.
I don't see Share My Calendar
Share My Calendar does not appear unless you are using an Exchange Server e-mail account. Also, if you have the Navigation Pane turned off or covered by the main Calendar window, you won't see it. Hide or show the Navigation Pane.
2. Do one of the following:
Allow anyone to access your Calendar
1. In the Name box, click Default.
2. Under Permissions, in the Permission Level list, click the permission level that you want.
For details about permission levels, see Outlook folder permissions.
You can create custom permissions by selecting the check boxes and options under Permissions.
Specify the people who can access your Calendar
3. Click Add.
4. In the Add Users dialog box, in the Type Name or Select from List box, enter the name of the person whom you want to grant sharing permissions to.
5. Under Add Users, click Add, and then click OK.
6. In the Name box, click the name of the person you just added.
7. Under Permissions, in the Permission Level list, click the permission level that you want.
For details about permission levels, see Outlook folder permissions.
You can create custom permissions by selecting the check boxes and options under Permissions.
Important If you select the Private check box on a Calendar item in Microsoft Office Outlook Support 2003, do not grant Read permission to your Calendar folder to anyone whom you do not want to see private items. A person who is granted Read permission to access your folders could use programmatic methods or other e-mail applications to view the details in a private item.

Thursday, June 26, 2008

Calendar Printing Tools for Outlook

This is a collection of print tools for the Microsoft Outlook Calendar, Outlook Support and Email Support.

In order to use the Word templates you will need to change macro security in Word's Tools, Macros, Security... to Medium, then close Word and reopen it. Approve the macro dialog when you load the template. In Word 2007, macro settings are in Office icon (former File menu location), Word Options, Trust Center link on left, Trust Center Settings button on bottom.)

Even though the information on templates state they are for older versions of Outlook, these templates will work with all newer versions of Outlook and Word, including 2003 and 2007.

Note that Outlook 2007 suffers from a printing bug where events which extend into multiple weeks do not print properly. Install Outlook 2007 SP1 or use the Calendar Printing Assistant instead.

If you are having problems printing duplex calendars correctly in Outlook 2003, see Outlook 2003 Calendar Duplex Printing Bug for more information.

Blueprint for Outlook Blueprint provides a suite of useful printing features. Reduce Paper Usage by printing selection and page range. Use the Blueprint Quick buttons to perform repetitive or complex printing operations in a single click - Print Message and Attachments. Control Print Layout - Add Headers and Footers including Company Logo and Sensitivity Markings. Automatically print incoming / outgoing messages and attachments. Choose to only autoprint the first page. Choose to include/exclude specific attachment types in print jobs. Add print buttons to a separate Outlook toolbar for extra control. Available in Basic, Professional, and Enterprise versions. Supports Outlook 2000-2007 Vista, Windows XP and Windows 2000.

Calendar Printing Assistant for Outlook 2007 The Calendar Printing Assistant for Office Outlook 2007 allows you to print and customize your Outlook 2007 calendar information. It includes many often-requested printing options, including multiple calendars in one view and customizations such as fonts, colors and images. It includes ready to use templates.

More Productive Tools for Outlook More Productive Tools for Outlook is an innovative tool that expands your ability to get information into and out of Outlook quickly and effectively. More Productive Tools provides you with a vast array of capabilities to make your Outlook use more productive and efficient. Supports Outlook 2000, 2002 (XP), 2003 and 2007. Currently Free. Beta

My Outlook Calendar Customizable Word template for generating Outlook weekly and monthly calendars. Print any Outlook calendar that you have access to, including calendars from other users' mailboxes and Public Folders. Add color coding by category or by type of item (one-day event, multiple-day event, etc.) Specify time and date formats and the title for the calendar. Slower than the Microsoft template (below), but it does much more and follows progress in the status bar. Office 97/Outlook 98 version available.

Outcal Enhanced Word template for printing, viewing and web publishing monthly calendars from Outlook data. Based on the Microsoft template. Includes category-based color-coding, better performance.

Outlook Calendar Template Use the Outlook Calendar Template for Word, then File | Save as HTML. Since the function that builds the calendar from your Outlook appointments is all in VBA, you can potentially customize it to create exactly the type of calendar you want. (HINT: Look at the Insertappointment subroutine.) See More on the Outlook Calendar Template.

Outlook Year View Control ActiveX control that provides a full year view of Outlook appointments, with different colors for categories. Setup program builds a web page to display the planner view of any calendar folder in Outlook as a folder home page. Includes ASP .NET application for Internet or Intranet use. Print4OL

Print4OL is a Outlook COM-Addin for printing or showing single (memo style) or multiple (table style, report style, calendar style or label style) items in MS-Word®, using Word Templates. Supported on Windows XP/Vista, Outlook and Word XP/2003/2007 with latest Service Pack.

Yearly Calendar view for Outlook VB Code sample for a yearly planner style calendar. It reads your default Outlook calendar and creates a HTML calendar. Supports up to 12 months. Code can be adapted to filter out categories.

Monday, June 16, 2008

Add Holiday In your Calendar List

Microsoft Office Outlook 2003 includes country/region holidays through the end of 2007

I am continuing with Outlook Support and Email support. Then following steps help to Add Holiday In a calendar List.

  1. On the Tools menu, click Options, and then click Calendar Options.
  2. Under Calendar options, click Add Holidays.
  3. Select the check box next to each country/region whose holidays you want to add to your Calendar, and then click OK. Your own country/region is automatically selected.

Tuesday, June 10, 2008

Find a conference room using Outlook

When you create a meeting request, it is typical and convenient to include the meeting location for the meeting or event. You can use the Address Book to find a conference room.

Note This feature requires you to use a Microsoft Exchange Server 2007 account. Most home and personal accounts do not use Microsoft Exchange. For more information about Microsoft Exchange accounts and how to determine which version of Exchange your account connects to, see the links in the See Also section.

  1. On the File menu, point to New, and then click Meeting Request.

Keyboard shortcut To create a new meeting request, press CTRL+SHIFT+Q.

  1. In the Subject box, type a description of the meeting or event.
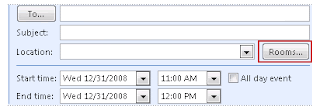
3. To open the Address Book to see which rooms are available, next to the Location box, click Rooms.


If you don't see the Rooms button, you might have:

    • Opened an appointment instead of a meeting request.
    • Clicked New on the toolbar instead of opening a meeting request on the File menu. By default, when in Calendar, clicking New on the File menu opens an appointment.

In both cases, the Rooms button is not displayed until you add at least one other person. It makes the appointment into a meeting request. To change an appointment to a meeting request, on the Appointment tab, in the Show group, click Scheduling Assistant.

4. Complete the meeting request and send it.

Thursday, May 29, 2008

Schedule an in-person meeting

· On the File menu, point to New, and then click Meeting Request.

Keyboard shortcut To create a new meeting request, press CTRL+SHIFT+Q.

· In the Subject box, type a description.

· In the Location box, type a description or click Rooms to choose from rooms available for automatic scheduling by using Microsoft Exchange.

· In the Start time and End time lists, select the start and end time for the meeting. If this is an all day event, select the All day event check box.

An all day event is a full 24 hour event lasting from midnight to midnight.

Note By default, the current time zone setting on your computer system is used to schedule meetings. If you want to schedule meetings based upon an alternate time zone, on the Meeting tab, in the Options group, click Time Zones.

· Type any information that you want to share with the recipients, attach any files, or create a Meeting Workspace.

For more information about Meeting Workspaces, see the See Also section.

· On the Meeting tab, in the Show group, click Scheduling Assistant.

The Scheduling Assistant helps to find the best time for your meeting.

· Click Add Others, and then click Add from Address Book.

· In the Select Attendees and Resources dialog box, in the Search box, enter the name of a person or resource that you want to invite to the meeting. If you are searching with the More Columns option, then click Go.

· Select the name from the results list, and click Required, Optional, or Resources, and then click OK.

Required and Optional attendees appear in the To box on the Meeting tab, and Resources appear in the Location box.

The free/busy grid shows the availability of attendees. A green vertical line represents the start of the meeting. A red vertical line represents the end of the meeting.


The Suggested Times pane locates the best time for your meeting, which is defined as the time when most attendees are available. The best meeting time appears at the top of the pane. To select any of the suggested times, click the time suggestion in the Suggested Times pane. You can also manually pick a time on the free/busy grid.


· If you want to make the meeting recur, on the Meeting tab, in the Options group, click Recurrence, select the recurrence pattern, and then click OK.

When you add a recurrence pattern to a meeting request, the Meeting tab changes to Recurring Meeting.

· On the Meeting tab, in the Show group, click Appointment.

· Click Send.

I want to share my experience with Microsoft Outlook Support and Computer Help

Monday, May 26, 2008

Prevent meeting request replies

In Microsoft Office Outlook, you can send a meeting request and not track the attendees' responses. Not tracking the responses can be useful when you send a meeting request to a large number of attendees but do not want to know who can and cannot attend.

Turn off meeting request responses

In a new meeting request, do the following:
  1. On the Meeting tab, in the Attendees group, click Responses.

Note For recurring meetings, the Meeting tab appears as the Recurring Meeting tab.

  1. Click Request Responses to clear the Request Responses and Allow New Time Proposal check boxes.

Note If you turn off the Request Responses option, you will not be able to track whether attendees have accepted, tentatively accepted, or declined. For instance, when you open the meeting in your calendar, click the Meeting tab, and then click Tracking in the Show group, the Response column will display None for all of the attendees.

Turn off responses after you send the meeting request

Even if you don't turn off the response option when you initially send the meeting request, you can change the option at any time.

  1. Open the meeting.
  2. On the Meeting tab, in the Attendees group, click Responses.

Note For recurring meetings, the Meeting tab appears as the Recurring Meeting tab.

  1. Click Request Responses to clear the Request Responses and Allow New Time Proposal check boxes.
  2. Click Send Update.

It is necessary to click Send Update so that the meeting request is updated in Outlook for all meeting attendees. If you want to go for Outlook Support and want to fix your issue, you can take Computer Help