Microsoft Outlook is the email client included with the Microsoft Office suite. It is designed to operate as an independent personal information manager, as an Internet mail client, or in conjunction with the Microsoft Exchange Server for group scheduling, email, and task management. It manages email, calendars, contacts, tasks, to-do lists, and documents or files on the hard drive. Outlook helps you communicate through email, phone support, and group scheduling capabilities. Outlook also helps you share information by means of public folders, forms, and Internet connectivity.
Outlook juggles scheduling, group ware, personal information (contacts, tasks), email, and documents all in one place, and allows you to create and view information using a consistent interface.
You can find information easily with Windows shortcuts, which let you navigate to any private, public, or file system folders. Outlook Journal helps you find a document based on creation date and name.
Microsoft Office Outlook 2003 includes country/region holidays through the end of 2007. To add holidays for calendar years 2008 through 2012.
Add or remove holidays
Do one of the following:
Add holidays
1. On the Tools menu, click Options, and then click Calendar Options.
2. Under Calendar options, click Add Holidays.
3. Select the check box next to each country/region whose holidays you want to add to your Calendar, and then click OK. Your own country/region is automatically selected.
Remove holidays
1. In Calendar, on the View menu, point to Arrange By, point to Current View, and then click Events.
2. Select the holidays you want to remove. To select multiple rows, press the CTRL key and click subsequent rows.
3. Click Delete Button image on the Standard toolbar (toolbar: A bar with buttons and options that you use to carry out commands. To display a toolbar, press ALT and then SHIFT+F10.).
Wednesday, June 10, 2009

Thursday, June 4, 2009
Unblock Attachments
Believe it or not but some people are actually creating and sending messages with attachments that will do your computer no good. Yes, you are correct; VIRUSES! There are a lot of file types in which a virus can reside. The most known are executables (programs) and scripts (automated processes). A filename consists out of 2 parts; a name and an extension. The extension is the part of the filename after the dot. For instance the filename document.doc. Document is the name part and doc is the extension part. The last part decides how the file opens. In our example a doc file will open with Microsoft Word.
At the moment there is a limited (but not a definite) list of file extensions that are known to be potential viruses. Outlook takes no changes and blocks these files whether or not it contains a virus because Outlook is not a virus scanner and therefore cannot determine whether the file is save or not. This is actually a good thing; even unknown viruses will be blocked this way! The downside of this is that occasionally you could receive a file that you know is clean but still can’t access. For instance; you receive a little (Flash) game or other program by e-mail.
Click here for the latest list of file types that are blocked by Outlook
Before I tell you how you can still access those attachments you must realize that you are creating a security risk on your computer this way. A good practise is to send these files in a compressed (for instance zip or rar) format. This enables you to scan the file before unpacking and it will also take less inbox space and upload/download time!
Enabling to receive blocked attachments involves changing the registry. I strongly recommend to only edit the registry when you actually receive an attachment and there is no other way in getting that file again in a saver way (in compressed format) and you know for sure that the file is clean. Also change back the registry directly after you saved the attachment. It probably sounds paranoid but you’ll be hitting yourself if you get infected because you “opened the door and invited the virus” yourself.
Alright, here goes;
1. Make sure Outlook is closed.
2. Open your registry editor by opening the Run command and type regedit (regedt32 for Windows 2000)
3. Locate the following key
Outlook 2000 [HKEY_CURRENT_USER\Software\Microsoft\Office\9.0\Outlook\Security]
Outlook 2002 [HKEY_CURRENT_USER\Software\Microsoft\Office\10.0\Outlook\Security]
Outlook 2003 [HKEY_CURRENT_USER\Software\Microsoft\Office\11.0\Outlook\Security]
Outlook 2007 [HKEY_CURRENT_USER\Software\Microsoft\Office\12.0\Outlook\Security]
4. Go to Edit-> New-> String Value and name the value Level1Remove (case sensitive!)
5. Double-click on the newly created value and enter the extension including the “dot” that you want to open in Outlook. For instance .exe
If you need to enter more than one extension you’ll have to type separate them by a semicolon like this; .exe;.bat;.url
6. Press OK on the input box and close the registry editor
7. When you open Outlook the attachments which hold those extensions aren’t blocked by Outlook anymore.
To let Outlook block those extensions again follow the instructions again but instead of creating the Level1Remove value delete it.
If you are not comfortable with manually editing the registry or prefer easier access to block/unblock attachments you can also use OutlookTools (free).
Again; change back the registry directly after you saved the attachment or you’ll leave a door open for viruses!
At the moment there is a limited (but not a definite) list of file extensions that are known to be potential viruses. Outlook takes no changes and blocks these files whether or not it contains a virus because Outlook is not a virus scanner and therefore cannot determine whether the file is save or not. This is actually a good thing; even unknown viruses will be blocked this way! The downside of this is that occasionally you could receive a file that you know is clean but still can’t access. For instance; you receive a little (Flash) game or other program by e-mail.
Click here for the latest list of file types that are blocked by Outlook
Before I tell you how you can still access those attachments you must realize that you are creating a security risk on your computer this way. A good practise is to send these files in a compressed (for instance zip or rar) format. This enables you to scan the file before unpacking and it will also take less inbox space and upload/download time!
Enabling to receive blocked attachments involves changing the registry. I strongly recommend to only edit the registry when you actually receive an attachment and there is no other way in getting that file again in a saver way (in compressed format) and you know for sure that the file is clean. Also change back the registry directly after you saved the attachment. It probably sounds paranoid but you’ll be hitting yourself if you get infected because you “opened the door and invited the virus” yourself.
Alright, here goes;
1. Make sure Outlook is closed.
2. Open your registry editor by opening the Run command and type regedit (regedt32 for Windows 2000)
3. Locate the following key
Outlook 2000 [HKEY_CURRENT_USER\Software\Microsoft\Office\9.0\Outlook\Security]
Outlook 2002 [HKEY_CURRENT_USER\Software\Microsoft\Office\10.0\Outlook\Security]
Outlook 2003 [HKEY_CURRENT_USER\Software\Microsoft\Office\11.0\Outlook\Security]
Outlook 2007 [HKEY_CURRENT_USER\Software\Microsoft\Office\12.0\Outlook\Security]
4. Go to Edit-> New-> String Value and name the value Level1Remove (case sensitive!)
5. Double-click on the newly created value and enter the extension including the “dot” that you want to open in Outlook. For instance .exe
If you need to enter more than one extension you’ll have to type separate them by a semicolon like this; .exe;.bat;.url
6. Press OK on the input box and close the registry editor
7. When you open Outlook the attachments which hold those extensions aren’t blocked by Outlook anymore.
To let Outlook block those extensions again follow the instructions again but instead of creating the Level1Remove value delete it.
If you are not comfortable with manually editing the registry or prefer easier access to block/unblock attachments you can also use OutlookTools (free).
Again; change back the registry directly after you saved the attachment or you’ll leave a door open for viruses!
Monday, June 1, 2009
Recover Deleted Messages
Exchange server users may be able to recover deleted items using Deleted Items recovery, if the administrator
has it enabled. If it's not enabled, they cannot recover items deleted from Exchange mailboxes.
How Outlook's Deleted Items folder works
A PST is a database. Items are records within the database and there is an index that points to each item. When you empty the Deleted Items folder, Outlook doesn't actually delete the items, it just deletes the items' listings from the index. The item is still in the PST, but unrecoverable because Outlook has no idea where it is without the pointer in the index. The space the item takes up is called "whitespace".
When you Compact a PST, the item is finally removed permanently and the whitespace is recovered, often shrinking the PST by many megabytes. Once the PST has 20% "whitespace", Outlook begins compacting the PST. If the Deleted Items folder contained a lot of messages, Outlook may begin compacting the PST immediately and the items will be deleted forever within a few minutes.
To recover the items which are no longer in the index you need to force Outlook to rebuild the index by causing corruption. You can cause corruption by using a Hex editor to delete some characters from the beginning of the PST file. If you delete the wrong ones you'll cause corruption but not in the index and Outlook won't rebuild the index.
Recover the Deleted Items
If you don't know what a Hex editor is, you probably shouldn't be hex editing anything, but if you want to try, Google for "hex editor" - UltraEdit is probably the best and easiest one to use. Before doing anything to the PST with a Hex Editor, make a copy of the PST, or you may end up losing all of your e-mail.
1.Open the PST in the Hex editor.
2.Delete positions 7 through 13 with the spacebar. Since you're using hexadecimal numbering, this actually clears 13 characters in the following positions:
00007, 00008, 00009, 0000a, 0000b, 0000c, 0000d
0000e, 0000f, 00010, 00011, 00012, 00013
As you clear the characters, the editor displays the code “20” in their position.
3.Save the PST, it is now corrupted.
4.Run the Inbox Repair Tool, SCANPST.exe, to recover the file. Use Windows Search utility to find it.
5. The Inbox Repair Tool creates a backup and repairs the damage and recreates the PST.
Open the new PST in Outlook. The Deleted Items folder should now contain the deleted messages, unless Outlook has already deleted them for good by compacting the PST.
has it enabled. If it's not enabled, they cannot recover items deleted from Exchange mailboxes.
How Outlook's Deleted Items folder works
A PST is a database. Items are records within the database and there is an index that points to each item. When you empty the Deleted Items folder, Outlook doesn't actually delete the items, it just deletes the items' listings from the index. The item is still in the PST, but unrecoverable because Outlook has no idea where it is without the pointer in the index. The space the item takes up is called "whitespace".
When you Compact a PST, the item is finally removed permanently and the whitespace is recovered, often shrinking the PST by many megabytes. Once the PST has 20% "whitespace", Outlook begins compacting the PST. If the Deleted Items folder contained a lot of messages, Outlook may begin compacting the PST immediately and the items will be deleted forever within a few minutes.
To recover the items which are no longer in the index you need to force Outlook to rebuild the index by causing corruption. You can cause corruption by using a Hex editor to delete some characters from the beginning of the PST file. If you delete the wrong ones you'll cause corruption but not in the index and Outlook won't rebuild the index.
Recover the Deleted Items
If you don't know what a Hex editor is, you probably shouldn't be hex editing anything, but if you want to try, Google for "hex editor" - UltraEdit is probably the best and easiest one to use. Before doing anything to the PST with a Hex Editor, make a copy of the PST, or you may end up losing all of your e-mail.
1.Open the PST in the Hex editor.
2.Delete positions 7 through 13 with the spacebar. Since you're using hexadecimal numbering, this actually clears 13 characters in the following positions:
00007, 00008, 00009, 0000a, 0000b, 0000c, 0000d
0000e, 0000f, 00010, 00011, 00012, 00013
As you clear the characters, the editor displays the code “20” in their position.
3.Save the PST, it is now corrupted.
4.Run the Inbox Repair Tool, SCANPST.exe, to recover the file. Use Windows Search utility to find it.
5. The Inbox Repair Tool creates a backup and repairs the damage and recreates the PST.
Open the new PST in Outlook. The Deleted Items folder should now contain the deleted messages, unless Outlook has already deleted them for good by compacting the PST.
Tuesday, May 26, 2009
Outlook Calendar
Microsoft Office Outlook provides a couple of features that can help you better organize appointments and events and filter the Calendar view to focus on specific items.
Create appointments and events
Just as you would write in a paper-based organizer, you can click on any time slot in the Outlook Calendar and begin typing. New gradient colors makes it easy to quickly see the current day and time. The current time is highlighted with color only in the Day and Work Week views. You can opt to have a sound or message remind you of appointments, meetings, and events, and you can color items for at-a-glance identification.
Organize meetings
Simply select a time on your Calendar, create an appointment, and select people to invite. Outlook will help you find the earliest time at which all the people are free. When the meeting notice is sent to invitees by e-mail, each will receive a meeting request in Inbox. When they open it, Outlook notifies them if the meeting conflicts with an existing item in their Calendar, and they can accept, tentatively accept, or decline your meeting by clicking a single button.
View group schedules
You can create calendars that show the schedules of a group of people or resources simultaneously.
View calendars side-by-side
You can view multiple calendars that you have created as well as those shared by other Outlook users side-by-side.
Link to calendars on Windows Share Point Services sites
If you have access to a Microsoft Windows Share Point Services site, you can view the events lists from that site in your Outlook Calendar. These items will be kept up-to-date and can be viewed side-by-side with other personal or shared calendars.
Manage another user's calendar
With the delegate access feature, one person can use his or her own copy of Outlook to easily manage another person's Calendar.
Create appointments and events
Just as you would write in a paper-based organizer, you can click on any time slot in the Outlook Calendar and begin typing. New gradient colors makes it easy to quickly see the current day and time. The current time is highlighted with color only in the Day and Work Week views. You can opt to have a sound or message remind you of appointments, meetings, and events, and you can color items for at-a-glance identification.
Organize meetings
Simply select a time on your Calendar, create an appointment, and select people to invite. Outlook will help you find the earliest time at which all the people are free. When the meeting notice is sent to invitees by e-mail, each will receive a meeting request in Inbox. When they open it, Outlook notifies them if the meeting conflicts with an existing item in their Calendar, and they can accept, tentatively accept, or decline your meeting by clicking a single button.
View group schedules
You can create calendars that show the schedules of a group of people or resources simultaneously.
View calendars side-by-side
You can view multiple calendars that you have created as well as those shared by other Outlook users side-by-side.
Link to calendars on Windows Share Point Services sites
If you have access to a Microsoft Windows Share Point Services site, you can view the events lists from that site in your Outlook Calendar. These items will be kept up-to-date and can be viewed side-by-side with other personal or shared calendars.
Manage another user's calendar
With the delegate access feature, one person can use his or her own copy of Outlook to easily manage another person's Calendar.
Thursday, May 14, 2009
iYogi Acquires Clean Machine Inc.
Larry Gordon, Founder of Clean Machine appointed as President Global Channel Sales at iYogi
New York, NY, May 11th, 2009 : iYogi, a global direct to consumer and small business remote technical support provider, today announced it’s acquisition of Clean Machine Inc, a provider of remotely administered PC security and performance management services. Clean Machine will operate as a separate brand under the iYogi services umbrella along with the recently lunched Support Dock (www.supportdock.com) and its comprehensive range of 24/7 technical support services for computers, printers, MP3 players, digital camera, routers, servers and more than 100 software applications. Larry Gordon, Founder of Clean Machine is appointed as the President of Global Channel Sales for iYogi.

iYogi will integrate technology and innovation that Clean Machine Inc. has developed for delivering an enhanced service experience by proactively managing the health and security for PC's and Apple Computers. This acquisition also broadens iYogi's access to key markets through Clean Machine's existing partnerships. Larry Gordon's past experience and successful track record will accelerate iYogi's expansion through his focus on global alliances.
Commenting on the acquisition of Clean Machine Inc., Uday Challu, CEO & Co-founder of iYogi, said,
"This acquisition will help iYogi to enhance our customer experience and extend our market reach to the millions of consumers that are challenged by the increasingly complex technology environment. Clean Machine's proactive maintenance and management of PCs in home and small business environment will be our launch platform for building the next generation of managed services for consumers."
"We are delighted to have Larry spearheading partnerships and global alliances for iYogi. His incredible experience in marketing, sales and building global alliances will help forge partnerships with retailers, multiple service operators, software publishers, original equipment manufacturers (OEM) and other such companies that are at the frontlines for managing tech support issues for consumers and small businesses",added Challu.
With more than 20 years of experience, Larry Gordon has played a variety of strategic roles in marketing, sales and building alliances. Larry was the Executive Vice President at Capgemini and Kanbay. He was also VP of Global Marketing for Cognizant (Nasdaq: CTSH), a leader in global IT services and Director of Marketing for New York based Information Builders.
"I am excited to join a company that shares a common mission to Clean Machine in creating a global brand for delivering the best technical support to consumers and small businesses. We also share a common approach of utilizing highly skilled talent with leading edge tools, thereby delivering services at incredible price-points, with high margins for our partners",said Larry Gordon, the newly appointed President of Global Channel Sales at iYogi.
ABOUT IYOGI
Headquartered in Gurgaon, India with offices in New York, USA, iYogi provides personalized computer support for consumers and small businesses in United States, United Kingdom, Canada and Australia. IYogi's 24/7 phone and remote technical assistance, spans across a comprehensive range of technologies we use every day from a wide range of vendors. Utilizing its proprietary technology iMantra , and highly qualified technicians, iYogi delivers amongst the highest benchmarks for resolution and customer satisfaction. iYogi is privately held and funded by SAP Ventures, Canaan Partners, and SVB India Capital Partners. iYogi was recently awarded the Red Herring Global 100 Award, recognizing it as one of the 100 most innovative private companies driving the future of technology. For more information on iYogi and a detailed list of technologies supported, visit: www.iyogi.net.
ABOUT CLEAN MACHINE
Clean Machine Inc. is a NJ-based and incorporated company that helps consumers and small business owners easily manage and protect their computing environments safely and cost effectively. The company is has a unique, powerful and inexpensive PC concierge service. Specifically, each customer is assigned a highly-trained tech concierge who remotely examines their computer system on a scheduled and very secure basis. The PC concierge will immediately fix software-based problems and prevent new threats to the customer's computing environment including offensive pop-ups, browser redirects and slow performance, and then provides a detailed report. Clean Machine's proprietary Radar(TM) technology (Remote Access Detection Audit and Repair) allows its expert technicians to remotely resolve any problems, eliminating the need for customers to go through the frustrating process of speaking with a tech support expert, and still having to do the work themselves. In other words, the Clean Machine PC concierges do it all. For more information on Clean Machine please visit www.pccleanmachine.com.
Thursday, January 29, 2009
iYogi Awarded Red Herring Top 100 Global Company
Recognizing the first, global, direct to consumers and small business technical support service from India
New York, January 21st, 2009 - iYogi (www.iyogi.net), today announced that it has been awarded as one of the Red Herring Top 100 Companies. Red Herring Top 100 Global Companies are chosen from winners and finalists of the previous Red Herring Top 100 Companies from North America, Europe and Asia Red Herring Top 100 Companies. Winning and finalist companies from the previous three years are were eligible for this outstanding award. Out of 1,800 successful and highly eligible companies, the Red Herring editorial team deployed a detailed process to drill-down the best companies first to 200 finalists, then to the top 100 winners of this global award. Evaluations were made on both quantitative and qualitative criteria, such as financial performance, innovation, management, global strategy, and ecosystem integration. The announcement of the winners was made at the Red Herring 100 Global, which took place in San Diego from January 14-16, 2009. Present among the finalists were elite executives and venture capital leaders from around the world.
"We were so pleased to announce iYogi as a Red Herring Top 100 Global Company," commented Red Herring publisher Alex Vieux."
"iYogi has proven to be a company excelling in their industry and its ripples have turned into waves. It was difficult for us to narrow down, but we are pleased to have included iYogi in our list of promising companies. We look forward to the changes it makes to its industry in the future".
"iYogi set out to introduce a new kind of service that would change the way technical support is delivered to consumers and small businesses. We are proud to be recognized by Red Herring's editorial team for our innovation and dedication to solve everyday problems faced by millions of consumers who are challenged by the increasingly complex computing environment," commented Uday Challu, CEO, iyogi.
iYogi delivers technical support services directly to consumers and small businesses and is the first, global, technical support brand based out of India. The company offers its customers an unlimited, annual service subscription for $139.99 per desktop that includes support for a wide range of technologies, including PC hardware Microsoft Windows Operating System, software applications, peripherals and multifunctional devices. iYogi recently launched Support Dock, a comprehensive desktop application suite with PC recovery, data backup, anti-virus and spyware removal , PC optimization, and home networking tools. Small businesses are serviced by iYogi's dedicated services group offering managed IT services enabling owners to increase productivity and maximize their return on investment.
About Red Herring
Red Herring is a global media company, which unites the world's best high technology innovators, venture investors and business decision makers in a variety of forums: a leading innovation magazine, an online daily technology news service, technology newsletters and major events for technology leaders around the globe. Red Herring provides an insider's access to the global innovation economy, featuring unparalleled insights on the emerging technologies driving the economy. More information about Red Herring is available on the Internet at www.redherring.com.
About iYogi
iYogi delivers live, comprehensive, 24/7 technical support services directly to consumers and small businesses and is the first, global, technical support brand based out of India. Providing an annual unlimited subscription to technical support, iYogi now boasts of more than 50,000 customers. The company employs 600 professionals servicing customers in the U.S., U.K., Canada, Australia and fast expanding to 12 new geographies across the globe. iYogi's resolution rate of 86 percent and customer satisfaction rate of 95 percent are amongst the highest published benchmarks in the industry. For further information, please visit - www.iyogi.net.
iYogi Contact:
Vishal Dhar
iYogi, Inc.
Phone: 212-229-0901
Email: vishal@iyogi.net
Red Herring Contact:
Anam Alpenia
Red Herring, Inc.
Phone: 650-428-2900
Email: aalpenia@redherring.com Yvonne Caprini
Logistics Manager
Red Herring, Inc.
Phone: 1 650 428 2900 x 410
Email: ycaprini@redherring.com
New York, January 21st, 2009 - iYogi (www.iyogi.net), today announced that it has been awarded as one of the Red Herring Top 100 Companies. Red Herring Top 100 Global Companies are chosen from winners and finalists of the previous Red Herring Top 100 Companies from North America, Europe and Asia Red Herring Top 100 Companies. Winning and finalist companies from the previous three years are were eligible for this outstanding award. Out of 1,800 successful and highly eligible companies, the Red Herring editorial team deployed a detailed process to drill-down the best companies first to 200 finalists, then to the top 100 winners of this global award. Evaluations were made on both quantitative and qualitative criteria, such as financial performance, innovation, management, global strategy, and ecosystem integration. The announcement of the winners was made at the Red Herring 100 Global, which took place in San Diego from January 14-16, 2009. Present among the finalists were elite executives and venture capital leaders from around the world.
"We were so pleased to announce iYogi as a Red Herring Top 100 Global Company," commented Red Herring publisher Alex Vieux."
"iYogi has proven to be a company excelling in their industry and its ripples have turned into waves. It was difficult for us to narrow down, but we are pleased to have included iYogi in our list of promising companies. We look forward to the changes it makes to its industry in the future".
"iYogi set out to introduce a new kind of service that would change the way technical support is delivered to consumers and small businesses. We are proud to be recognized by Red Herring's editorial team for our innovation and dedication to solve everyday problems faced by millions of consumers who are challenged by the increasingly complex computing environment," commented Uday Challu, CEO, iyogi.
iYogi delivers technical support services directly to consumers and small businesses and is the first, global, technical support brand based out of India. The company offers its customers an unlimited, annual service subscription for $139.99 per desktop that includes support for a wide range of technologies, including PC hardware Microsoft Windows Operating System, software applications, peripherals and multifunctional devices. iYogi recently launched Support Dock, a comprehensive desktop application suite with PC recovery, data backup, anti-virus and spyware removal , PC optimization, and home networking tools. Small businesses are serviced by iYogi's dedicated services group offering managed IT services enabling owners to increase productivity and maximize their return on investment.
About Red Herring
Red Herring is a global media company, which unites the world's best high technology innovators, venture investors and business decision makers in a variety of forums: a leading innovation magazine, an online daily technology news service, technology newsletters and major events for technology leaders around the globe. Red Herring provides an insider's access to the global innovation economy, featuring unparalleled insights on the emerging technologies driving the economy. More information about Red Herring is available on the Internet at www.redherring.com.
About iYogi
iYogi delivers live, comprehensive, 24/7 technical support services directly to consumers and small businesses and is the first, global, technical support brand based out of India. Providing an annual unlimited subscription to technical support, iYogi now boasts of more than 50,000 customers. The company employs 600 professionals servicing customers in the U.S., U.K., Canada, Australia and fast expanding to 12 new geographies across the globe. iYogi's resolution rate of 86 percent and customer satisfaction rate of 95 percent are amongst the highest published benchmarks in the industry. For further information, please visit - www.iyogi.net.
iYogi Contact:
Vishal Dhar
iYogi, Inc.
Phone: 212-229-0901
Email: vishal@iyogi.net
Red Herring Contact:
Anam Alpenia
Red Herring, Inc.
Phone: 650-428-2900
Email: aalpenia@redherring.com Yvonne Caprini
Logistics Manager
Red Herring, Inc.
Phone: 1 650 428 2900 x 410
Email: ycaprini@redherring.com
Monday, December 15, 2008
RED HERRING AWARDS IYOGI FOR THE 2008 RED HERRING ASIA AMERICA 100
Award Recognizes the 100 “Most Promising” Asian Companies Driving the Future of Technology
Silicon Valley, CA, Dec 9th, 2008— Red Herring today announced that iYogi is a winner of the Red Herring 100 Award, a selection of the 100 most innovative private technology companies based in Asia.
IYogi delivers technical support services directly to consumers and small businesses and is the first, global, technical support brand based out of India with more than 50,000 customers. The company offers consumers an unlimited, annual subscription service for $119.99 per desktop that includes support for a wide range of technologies, including PC hardware, Microsoft Products Support, Windows Operating systems, Computer Support, Software applications, MP3 players, Networking devices, Digital camera, Printers and scanners etc.
The Red Herring editorial board diligently surveyed the entrepreneurial scene throughout Asia and identified the top 100 out of more than 1,000 closely evaluated companies that are leading the next wave of innovation.
“Our winners and Finalists demonstrate that Asia is increasingly becoming a leader in innovation, contrary to common stereotypes", said Joel Dreyfuss, editor-in-chief of Red Herring. " It was tough to choose just the top 100 finalists from such a large list of excellent contenders, and we are very happy with the quality of the companies we selected as finalists."
“We believe consumers and small business owners should have low-cost access to the highest quality support available on the planet", said Uday Challu, CEO of iYogi. “We are thrilled that our innovative approach to solving everyday technology problems for consumers and our managed services for small businesses has been recognized by Red Herring’s keen-eyed leadership. We are continuously innovating in adding new services that includes PC recovery, anti-virus, anti-spyware, data back-up and PC optimization in providing the best tech support experience for our customers”, adds Uday.
The 100 winning companies have been announced at the Red Herring Asia event in Hong Kong. The CEOs of the winning start ups presented their innovative ideas and technologies to an audience of leading entrepreneurs, financiers, and corporate strategists at the event at the Hong Kong, JW Marriott Hotel earlier this week.
About iYogi
iYogi is the first direct-to-consumer and small business technical support service from India. Providing an annual unlimited subscription to technical support, iYogi now boasts of more than 50,000 customers. The company employs 600 professionals servicing customers in the US, UK, Canada, Australia and fast expanding to 12 new geographies across the globe. iYogi’s resolution rate of 87 percent and customer satisfaction rate of 93 percent are amongst the highest published benchmarks in the industry. For further information, please visit www.iyogi.net.
iYogi Contact
Vishal Dhar
President Marketing, iYogi Inc.
Phone: 212 229 0901
Email: vishal@iyogi.net
Silicon Valley, CA, Dec 9th, 2008— Red Herring today announced that iYogi is a winner of the Red Herring 100 Award, a selection of the 100 most innovative private technology companies based in Asia.
IYogi delivers technical support services directly to consumers and small businesses and is the first, global, technical support brand based out of India with more than 50,000 customers. The company offers consumers an unlimited, annual subscription service for $119.99 per desktop that includes support for a wide range of technologies, including PC hardware, Microsoft Products Support, Windows Operating systems, Computer Support, Software applications, MP3 players, Networking devices, Digital camera, Printers and scanners etc.
The Red Herring editorial board diligently surveyed the entrepreneurial scene throughout Asia and identified the top 100 out of more than 1,000 closely evaluated companies that are leading the next wave of innovation.
“Our winners and Finalists demonstrate that Asia is increasingly becoming a leader in innovation, contrary to common stereotypes", said Joel Dreyfuss, editor-in-chief of Red Herring. " It was tough to choose just the top 100 finalists from such a large list of excellent contenders, and we are very happy with the quality of the companies we selected as finalists."
“We believe consumers and small business owners should have low-cost access to the highest quality support available on the planet", said Uday Challu, CEO of iYogi. “We are thrilled that our innovative approach to solving everyday technology problems for consumers and our managed services for small businesses has been recognized by Red Herring’s keen-eyed leadership. We are continuously innovating in adding new services that includes PC recovery, anti-virus, anti-spyware, data back-up and PC optimization in providing the best tech support experience for our customers”, adds Uday.
The 100 winning companies have been announced at the Red Herring Asia event in Hong Kong. The CEOs of the winning start ups presented their innovative ideas and technologies to an audience of leading entrepreneurs, financiers, and corporate strategists at the event at the Hong Kong, JW Marriott Hotel earlier this week.
About iYogi
iYogi is the first direct-to-consumer and small business technical support service from India. Providing an annual unlimited subscription to technical support, iYogi now boasts of more than 50,000 customers. The company employs 600 professionals servicing customers in the US, UK, Canada, Australia and fast expanding to 12 new geographies across the globe. iYogi’s resolution rate of 87 percent and customer satisfaction rate of 93 percent are amongst the highest published benchmarks in the industry. For further information, please visit www.iyogi.net.
iYogi Contact
Vishal Dhar
President Marketing, iYogi Inc.
Phone: 212 229 0901
Email: vishal@iyogi.net
Sunday, August 31, 2008
Tuesday, August 5, 2008
Add or delete holidays and custom events in your calendar
By default, no holidays are added to your calendar when you begin using Microsoft Office Outlook.
Note If you are using Microsoft Office Outlook 2003 and want holidays for years 2008 through 2012, go for Microsoft Outlook Support Services.
More information about holidays and events
Holidays are all-day events.
You can also create custom holiday files for other types of nonholiday events, such as quarterly deadlines or your organization's paydays.
Add holidays and events
1. On the Tools menu, click Options, and then click Calendar Options.
2. Under Calendar options, click Add Holidays.

3. Select the check box next to each country/region whose holidays you want to add to your calendar, and then click OK.
Note Your own country/region is automatically selected.
If you already added a country's or region's holidays to your calendar, the check box for that country/region is selected in the Add Holidays to Calendar dialog box. If you try to add the same items again, you receive the following message:
Holidays for country/region are already installed. Do you want to install them again?
If you click Yes, the holidays and events are installed a second time, and you see duplicate holiday and event entries.
Note The holiday information that is provided with Outlook includes items during calendar years 2006 through 2012. If you are using a non-Gregorian calendar, items that occur during the same time period are included.
Delete holidays and events
You can also use the following steps to delete any duplicate holidays that were added while you were adding holidays to your calendar.
1. In Calendar, on the View menu, point to Current View, and then click Events.
2. Select the holidays that you want to delete. To select multiple rows, press the CTRL key, and then click other rows.
Tip Click the Calendar icon to select a row. Do not click in the data cells of the row.
3. Click Delete on the Standard toolbar.
Tip To quickly delete all of the holidays for a country/region, click the Location column heading to sort the list of events so that it displays all of the holidays for a country/region together.
Note If you are using Microsoft Office Outlook 2003 and want holidays for years 2008 through 2012, go for Microsoft Outlook Support Services.
More information about holidays and events
Holidays are all-day events.
You can also create custom holiday files for other types of nonholiday events, such as quarterly deadlines or your organization's paydays.
Add holidays and events
1. On the Tools menu, click Options, and then click Calendar Options.
2. Under Calendar options, click Add Holidays.

3. Select the check box next to each country/region whose holidays you want to add to your calendar, and then click OK.
Note Your own country/region is automatically selected.
If you already added a country's or region's holidays to your calendar, the check box for that country/region is selected in the Add Holidays to Calendar dialog box. If you try to add the same items again, you receive the following message:
Holidays for country/region are already installed. Do you want to install them again?
If you click Yes, the holidays and events are installed a second time, and you see duplicate holiday and event entries.
Note The holiday information that is provided with Outlook includes items during calendar years 2006 through 2012. If you are using a non-Gregorian calendar, items that occur during the same time period are included.
Delete holidays and events
You can also use the following steps to delete any duplicate holidays that were added while you were adding holidays to your calendar.
1. In Calendar, on the View menu, point to Current View, and then click Events.
2. Select the holidays that you want to delete. To select multiple rows, press the CTRL key, and then click other rows.
Tip Click the Calendar icon to select a row. Do not click in the data cells of the row.
3. Click Delete on the Standard toolbar.
Tip To quickly delete all of the holidays for a country/region, click the Location column heading to sort the list of events so that it displays all of the holidays for a country/region together.
Wednesday, July 30, 2008
How to Share my Calendar
1. In Calendar, in the Navigation Pane (Navigation Pane: The column on the left side of the Outlook window that includes panes such as Shortcuts or Mail and the shortcuts or folders within each pane. Click a folder to show the items in the folder.), click Share My Calendar.
I don't see Share My Calendar
Share My Calendar does not appear unless you are using an Exchange Server e-mail account. Also, if you have the Navigation Pane turned off or covered by the main Calendar window, you won't see it. Hide or show the Navigation Pane.
2. Do one of the following:
Allow anyone to access your Calendar
1. In the Name box, click Default.
2. Under Permissions, in the Permission Level list, click the permission level that you want.
For details about permission levels, see Outlook folder permissions.
You can create custom permissions by selecting the check boxes and options under Permissions.
Specify the people who can access your Calendar
3. Click Add.
4. In the Add Users dialog box, in the Type Name or Select from List box, enter the name of the person whom you want to grant sharing permissions to.
5. Under Add Users, click Add, and then click OK.
6. In the Name box, click the name of the person you just added.
7. Under Permissions, in the Permission Level list, click the permission level that you want.
For details about permission levels, see Outlook folder permissions.
You can create custom permissions by selecting the check boxes and options under Permissions.
Important If you select the Private check box on a Calendar item in Microsoft Office Outlook Support 2003, do not grant Read permission to your Calendar folder to anyone whom you do not want to see private items. A person who is granted Read permission to access your folders could use programmatic methods or other e-mail applications to view the details in a private item.
I don't see Share My Calendar
Share My Calendar does not appear unless you are using an Exchange Server e-mail account. Also, if you have the Navigation Pane turned off or covered by the main Calendar window, you won't see it. Hide or show the Navigation Pane.
2. Do one of the following:
Allow anyone to access your Calendar
1. In the Name box, click Default.
2. Under Permissions, in the Permission Level list, click the permission level that you want.
For details about permission levels, see Outlook folder permissions.
You can create custom permissions by selecting the check boxes and options under Permissions.
Specify the people who can access your Calendar
3. Click Add.
4. In the Add Users dialog box, in the Type Name or Select from List box, enter the name of the person whom you want to grant sharing permissions to.
5. Under Add Users, click Add, and then click OK.
6. In the Name box, click the name of the person you just added.
7. Under Permissions, in the Permission Level list, click the permission level that you want.
For details about permission levels, see Outlook folder permissions.
You can create custom permissions by selecting the check boxes and options under Permissions.
Important If you select the Private check box on a Calendar item in Microsoft Office Outlook Support 2003, do not grant Read permission to your Calendar folder to anyone whom you do not want to see private items. A person who is granted Read permission to access your folders could use programmatic methods or other e-mail applications to view the details in a private item.
Thursday, June 26, 2008
Calendar Printing Tools for Outlook
This is a collection of print tools for the Microsoft Outlook Calendar, Outlook Support and Email Support.
In order to use the Word templates you will need to change macro security in Word's Tools, Macros, Security... to Medium, then close Word and reopen it. Approve the macro dialog when you load the template. In Word 2007, macro settings are in Office icon (former File menu location), Word Options, Trust Center link on left, Trust Center Settings button on bottom.)
Even though the information on templates state they are for older versions of Outlook, these templates will work with all newer versions of Outlook and Word, including 2003 and 2007.
Note that Outlook 2007 suffers from a printing bug where events which extend into multiple weeks do not print properly. Install Outlook 2007 SP1 or use the Calendar Printing Assistant instead.
If you are having problems printing duplex calendars correctly in Outlook 2003, see Outlook 2003 Calendar Duplex Printing Bug for more information.
Blueprint for Outlook Blueprint provides a suite of useful printing features. Reduce Paper Usage by printing selection and page range. Use the Blueprint Quick buttons to perform repetitive or complex printing operations in a single click - Print Message and Attachments. Control Print Layout - Add Headers and Footers including Company Logo and Sensitivity Markings. Automatically print incoming / outgoing messages and attachments. Choose to only autoprint the first page. Choose to include/exclude specific attachment types in print jobs. Add print buttons to a separate Outlook toolbar for extra control. Available in Basic, Professional, and
Calendar Printing Assistant for Outlook 2007 The Calendar Printing Assistant for Office Outlook 2007 allows you to print and customize your Outlook 2007 calendar information. It includes many often-requested printing options, including multiple calendars in one view and customizations such as fonts, colors and images. It includes ready to use templates.
More Productive Tools for Outlook More Productive Tools for Outlook is an innovative tool that expands your ability to get information into and out of Outlook quickly and effectively. More Productive Tools provides you with a vast array of capabilities to make your Outlook use more productive and efficient. Supports Outlook 2000, 2002 (XP), 2003 and 2007. Currently Free. Beta
My Outlook Calendar Customizable Word template for generating Outlook weekly and monthly calendars. Print any Outlook calendar that you have access to, including calendars from other users' mailboxes and Public Folders. Add color coding by category or by type of item (one-day event, multiple-day event, etc.) Specify time and date formats and the title for the calendar. Slower than the Microsoft template (below), but it does much more and follows progress in the status bar. Office 97/Outlook 98 version available.
Outcal Enhanced Word template for printing, viewing and web publishing monthly calendars from Outlook data. Based on the Microsoft template. Includes category-based color-coding, better performance.
Outlook Calendar Template Use the Outlook Calendar Template for Word, then File | Save as HTML. Since the function that builds the calendar from your Outlook appointments is all in VBA, you can potentially customize it to create exactly the type of calendar you want. (HINT: Look at the Insertappointment subroutine.) See More on the Outlook Calendar Template.
Outlook Year View Control ActiveX control that provides a full year view of Outlook appointments, with different colors for categories. Setup program builds a web page to display the planner view of any calendar folder in Outlook as a folder home page. Includes ASP .NET application for Internet or Intranet use. Print4OL
Print4OL is a Outlook COM-Addin for printing or showing single (memo style) or multiple (table style, report style, calendar style or label style) items in MS-Word®, using Word Templates. Supported on Windows XP/Vista, Outlook and Word XP/2003/2007 with latest Service Pack.
Yearly Calendar view for Outlook VB Code sample for a yearly planner style calendar. It reads your default Outlook calendar and creates a HTML calendar. Supports up to 12 months. Code can be adapted to filter out categories.
Monday, June 16, 2008
Add Holiday In your Calendar List
Microsoft Office Outlook 2003 includes country/region holidays through the end of 2007
I am continuing with Outlook Support and Email support. Then following steps help to Add Holiday In a calendar List.
- On the Tools menu, click Options, and then click Calendar Options.
- Under Calendar options, click Add Holidays.
- Select the check box next to each country/region whose holidays you want to add to your Calendar, and then click OK. Your own country/region is automatically selected.
Tuesday, June 10, 2008
Find a conference room using Outlook
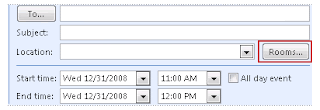
When you create a meeting request, it is typical and convenient to include the meeting location for the meeting or event. You can use the Address Book to find a conference room.
Note This feature requires you to use a Microsoft Exchange Server 2007 account. Most home and personal accounts do not use Microsoft Exchange. For more information about Microsoft Exchange accounts and how to determine which version of Exchange your account connects to, see the links in the See Also section.
- On the File menu, point to New, and then click Meeting Request.
Keyboard shortcut To create a new meeting request, press CTRL+SHIFT+Q.
- In the Subject box, type a description of the meeting or event.

If you don't see the Rooms button, you might have:
- Opened an appointment instead of a meeting request.
- Clicked New on the toolbar instead of opening a meeting request on the File menu. By default, when in Calendar, clicking New on the File menu opens an appointment.
In both cases, the Rooms button is not displayed until you add at least one other person. It makes the appointment into a meeting request. To change an appointment to a meeting request, on the Appointment tab, in the Show group, click Scheduling Assistant.
4. Complete the meeting request and send it.
Thursday, May 29, 2008
Schedule an in-person meeting
· On the File menu, point to New, and then click Meeting Request.
Keyboard shortcut To create a new meeting request, press CTRL+SHIFT+Q.
· In the Subject box, type a description.
· In the Location box, type a description or click Rooms to choose from rooms available for automatic scheduling by using Microsoft Exchange.
· In the Start time and End time lists, select the start and end time for the meeting. If this is an all day event, select the All day event check box.
An all day event is a full 24 hour event lasting from midnight to midnight.
Note By default, the current time zone setting on your computer system is used to schedule meetings. If you want to schedule meetings based upon an alternate time zone, on the Meeting tab, in the Options group, click Time Zones.
· Type any information that you want to share with the recipients, attach any files, or create a Meeting Workspace.
For more information about Meeting Workspaces, see the See Also section.
· On the Meeting tab, in the Show group, click Scheduling Assistant.
The Scheduling Assistant helps to find the best time for your meeting.
· Click Add Others, and then click Add from Address Book.
· In the Select Attendees and Resources dialog box, in the Search box, enter the name of a person or resource that you want to invite to the meeting. If you are searching with the More Columns option, then click Go.
· Select the name from the results list, and click Required, Optional, or Resources, and then click OK.
Required and Optional attendees appear in the To box on the Meeting tab, and Resources appear in the Location box.
The free/busy grid shows the availability of attendees. A green vertical line represents the start of the meeting. A red vertical line represents the end of the meeting.

The Suggested Times pane locates the best time for your meeting, which is defined as the time when most attendees are available. The best meeting time appears at the top of the pane. To select any of the suggested times, click the time suggestion in the Suggested Times pane. You can also manually pick a time on the free/busy grid.

· If you want to make the meeting recur, on the Meeting tab, in the Options group, click Recurrence, select the recurrence pattern, and then click OK.
When you add a recurrence pattern to a meeting request, the Meeting tab changes to Recurring Meeting.
· On the Meeting tab, in the Show group, click Appointment.
· Click Send.
I want to share my experience with Microsoft Outlook Support and Computer HelpMonday, May 26, 2008
Prevent meeting request replies
In Microsoft Office Outlook, you can send a meeting request and not track the attendees' responses. Not tracking the responses can be useful when you send a meeting request to a large number of attendees but do not want to know who can and cannot attend.
Turn off meeting request responses
In a new meeting request, do the following:- On the Meeting tab, in the Attendees group, click Responses.
Note For recurring meetings, the Meeting tab appears as the Recurring Meeting tab.
- Click Request Responses to clear the Request Responses and Allow New Time Proposal check boxes.

Note If you turn off the Request Responses option, you will not be able to track whether attendees have accepted, tentatively accepted, or declined. For instance, when you open the meeting in your calendar, click the Meeting tab, and then click Tracking in the Show group, the Response column will display None for all of the attendees.
Turn off responses after you send the meeting request
Even if you don't turn off the response option when you initially send the meeting request, you can change the option at any time.
- Open the meeting.
- On the Meeting tab, in the Attendees group, click Responses.
Note For recurring meetings, the Meeting tab appears as the Recurring Meeting tab.
- Click Request Responses to clear the Request Responses and Allow New Time Proposal check boxes.
- Click Send Update.
It is necessary to click Send Update so that the meeting request is updated in Outlook for all meeting attendees. If you want to go for Outlook Support and want to fix your issue, you can take Computer Help
Tuesday, May 20, 2008
Add or remove a second time zone
You can display a second time zone in your calendar by selecting the Show an additional time zone check box in the Time Zone dialog box. The second time zone is used only to show a second time bar in Calendar view, and does not affect the way in which calendar items are stored or displayed.
Note The additional time zone is not affected by the current time zone settings; it is completely separate.
- On the Tools menu, click Options.
- Click Calendar Options.
- Click Time Zone.
- Do one of the following:
- Add a second time zone
- Select the Show an additional time zone check box.
- In the Label box, type a name for the second time zone.
- In the Time zone box, click the time zone that you want to add.
- If you want your computer clock to automatically adjust for daylight saving time changes, select the Adjust for daylight saving time check box.
This option is available only in time zones that use daylight saving time (DST).
- Remove a second time zone
- Clear the Show an additional time zone check box.
Tip You can quickly switch your current time zone to the second time zone by clicking Swap Time Zones. This affects all times displayed in Outlook as well as times displayed in other Microsoft Windows-based applications.
I want to share My Experience with Microsoft Outlook Calender with computer Help and Technical Support
Sunday, May 11, 2008
Display a different primary calendar
This feature applies to any language that enables an alternate Calendar Arabic, English, Hebrew, Hindi, Chinese, Japanese, Korean, and
Do one of the following:
In Microsoft Windows XP
- Click Start, and then click Control Panel.
- Double-click the Regional and Language Options icon.
- In the list, click the language for the calendar that you want to use.
- Click Customize, and then click the Date tab.
- In the Calendar type list, click the calendar you want to use.
- Under Short date and Long date, select the options you want.
In Microsoft Windows 2000
- Click Start, click Settings, and then click Control Panel.
- Double-click the Regional Options icon.
- In the list, click the language for the calendar that you want to use.
- Click the Date tab.
- In the Calendar type list, click the calendar you want to use.
- Under Short date and Long date, select the options you want.
I want to share here with you is my experience of sharing the Microsoft Outlook and providing Computer Help assistance for Computer Troubleshooting.
Tuesday, May 6, 2008
What is Calendar Coloring in Outlook?
Microsoft Outlook has 10 colors that you can use to color appointments and meetings. These colors are visible in Day/Week/Month view of Calendar. You can color individual or recurring appointments and meetings manually, or you can use rules to automatically color items that meet certain conditions, such as when a certain word is used in the subject or when a meeting request is sent by a certain person. Manual coloring always take precedence over automatic coloring, so if you have applied manual coloring to an item, automatic coloring will not be applied to it.
If you open another person’s calendar or a calendar stored in a public folder, you will see the colors that were assigned manually, but no automatic coloring. Automatic coloring can be seen only by the person who set it up.
Each color comes with a label. You can change these labels to make them more meaningful to you. For example, you can change the label of the color red from "important" to "urgent."
Displaying your availability status
When you view Calendar in Day or Work Week view, the pattern of the availability indicator to the left of any appointment or meeting displays your availability status for that time period: free, tentative, busy, or out of Microsoft office.
Monday, April 28, 2008
How to Customize a group schedule in Outlook
- In Calendar, on the Actions menu, click View Group Schedules.
- Click the group schedule you want, and then click Open.
- Click Options, and then click any of the following:
- Show Only Working Hours By default, the group calendar displays the working hours you have specified in the Start time and End time boxes in the Calendar Options dialog box (Tools menu, Options command). If you clear the check box next to Show Only Working Hours, you will see all 24 hours of each day when you look at the group calendar.
- Show Calendar Details By default, the group calendar displays details of all calendar items, unless an item has been marked private by its owner. If you clear the check box next to this option, the calendar will not include any details.
- Auto Pick Finds available times for all group members.
- Refresh Free/Busy Connects to the free/busy (free/busy time: In Calendar, time status and user defined labels are indicated by colors and patterns.) server and obtain the latest free/busy information for all group members.
I have to sketch out the details once again before this Monday for a official presentation. But then what i want to share here with you is my experience of sharing the Microsoft Outlook and providing a computer support assistance.
Thursday, April 24, 2008
You can use Microsoft Office Outlook to print a blank calendar. Blank calendars may be useful to take notes on or to consult when you meet to discuss a project with your team.
Steps to print a blank calendar
- On the File menu, point to New, and then click Folder.
- In the Create New Folder dialog box, in the Name text box, type a name for the folder.
- In the Folder contains list, click Calendar Items.
- In the Select where to place the folder list, click Calendar, and then click OK.
- In Calendar, in the Navigation Pane under the My Calendars section, select the check box for the calendar you created.
- On the File menu, click Print.
- In the Print dialog box, under Print this calendar, click the calendar you created.
- Select the print style options you want, and then click OK.